
If you use Visual Studio Code on a daily basis for your development, you likely already have a set of favorite extensions that improve your productivity. You've also probably run into a situation where you keep repeating a certain action, text transformation, etc.
If I have to do the same action more than 3 or so times, I'll usually go searching for an extension that fits my use case. Sometimes, I'll find the right extension the first time — it has all the features I need, it's well documented, and seems to be actively supported. Awesome — time to move on with my work.
But there have also been many instances where the extension I found didn't quite work as I needed, had bugs, or simply wasn't maintained anymore. Oftentimes I couldn't find an extension that did what I wanted at all.
The Problem
Recently, my team was tasked with setting up our React application to support multiple languages. Seeing as this was over a year into development, there were lots of areas where English copy needed to be extracted, tokenized and translated. At a minimum, 3 files needed to be updated to add a key, the English copy, and for the first pass, a placeholder Spanish translation using Google Translate.
Naturally, I first looked for an extension that would send my English copy to the Google Translate API and replace it. I found one, and it worked for a while, but eventually broke without support from the developer. I found another one that worked, but I eventually became frustrated with the tedium of the whole process, with or without the Google Translate extension:
- Open the interface that defines keys which each language file must "implement" (or provide a translated value for)
- Insert the new key in the correct alphabetical position
- Open the English translation file
- Add the new key and its English copy in alphabetical position
- Open the Spanish translation file
- Add the new key and its English copy in alphabetical position
- Highlight the English copy and translate it using an extension wrapping the Google Translate API
I didn't find any extensions that quite fit this workflow for managing keys and translations in TypeScript. I had been curious about VS Code extension development for a while, so I decided this was the perfect opportunity to get my feet wet. The goal for this extension was to automate the process of adding keys and copy to various translation files, using the Google Translate API for placeholders. After a few Friday afternoons and weekends, I proudly presented the kazoo extension to my team.
In this article, I'll be giving an overview of how to get started building a VS Code extension. While I would encourage you to look for existing extensions or contributing to existing extensions before creating your own, it can be a valuable learning experience and a powerful tool to keep in your back pocket.
This article assumes the reader has a baseline level of knowledge on git, npm, NodeJS, and of course, VS Code.
Getting Started
The official "Getting Started" guide for developing an extension recommends using Yeoman, a code generator written in NodeJS, to scaffold out the project with a simple ‘Hello World' extension.
Run the following command to install Yeoman and the VS Code generator:
npm install -g yo generator-code
Once both have been successfully installed, you should be able to run Yeoman to configure your project:
yo code
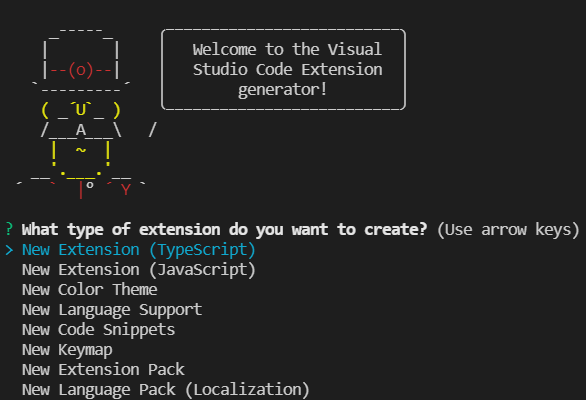
Screenshot of the interactive prompt that Yeoman opens with
If you have any experience with TypeScript, I would highly recommend setting up the project with it from the start — I won't gush over the benefits that TypeScript gives for modern JavaScript development here, but you should still be able to reasonably follow along with this article even without TypeScript experience.
As far as configuration goes, give your extension a name, identifier and description. The name is the "pretty" name that users will primarily see, while the identifier is used for… uniquely identifying your extension along with your marketplace organization, ie brandongregoryscott.kazoo.
You will also want to initialize a git repository to save your changes and keep your code in source control unless you've already initialized one yourself.
Finally, it will ask if you'd like to use webpack to bundle your source code. While this isn't strictly required, the official documentation recommends using some module bundler to reduce the file count in the packaged extension for performance reasons. For the sake of this article, enabling webpack is a great choice since it provides an out-of-the-box configuration, though you can certainly use other JavaScript build tools (ESBuild, Parcel, etc.) if you'd like.
My final configuration for this looked like this, but yours may be different:
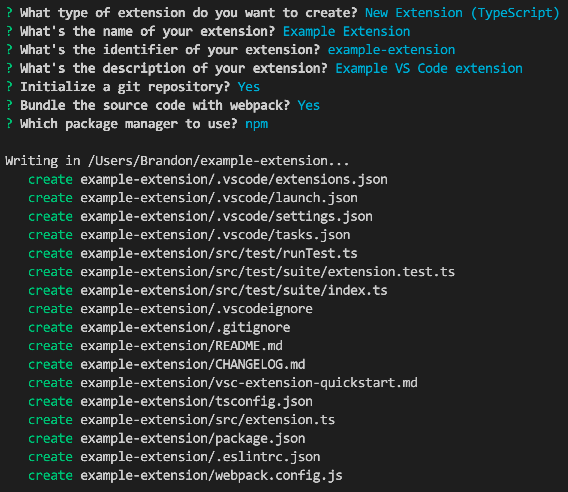
Example configuration/output from Yeoman
Project Structure
A high-level overview of the generated project — files that you will be primarily editing or are specific to VS Code extensions.
├── .vscode          # Holds various VS Code configuration files, most notably a set of launch tasks for running and debugging your extension.
├── src              # Source folder for the extension's TypeScript files
│   ├── test         # Generated extension test suite
│   └── extension.ts # Entrypoint for the extension, defines activate/deactivate functions
├── .vscodeignore    # Configuration file to exclude files/directories from the packaged extension
├── package.json     # Package manifest file defining its name, author, dependencies, as well as extension-specific configurations: commands, activation events, and settings.
While most (if not all) of your extension's business logic can live in extension.ts, you are free to break out functions, variables, etc. into other files to be structured to your liking. Since we're using webpack to bundle the extension for distribution, there's no drawback to doing so — I would encourage it to improve maintainability and code reuse.
The markdown files (README.md, CHANGELOG.md, and vsc-extension-quickstart.md) are safe to delete or update to be more relevant to your extension.
The other configuration files (.eslintrc.json, tsconfig.json, and webpack.config.js) should be sufficient to get you started, but can also be tweaked as needed.
Running and Debugging
At this point, you should be able to run the "Run Extension" launch task via the Run and Debug panel in VS Code:
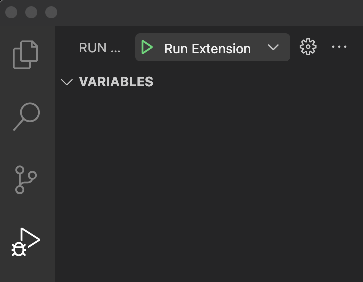
Screenshot of the ‘Run and Debug' panel in VS Code
This will open up a second instance of VS Code with the extension loaded. Out of the box, the generated extension provides one command that can be executed through the command palette: "Hello World". You can open the command palette by pressing SHIFT + CMD (Mac), CTRL (Windows) + P, or with F1. When executed, the command shows an informational toast and exits.

Command palette filtered down by "hello"

Informational toast by running the default ‘Hello World' command
Note: while the launch task runs the ‘watch' script to rebuild on changes, the extension development host will not automatically pick up the new code — you will need to restart it by stopping & starting it or using the green ‘Restart' icon.
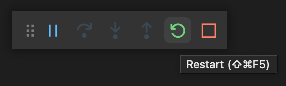
Restart the development instance of VS Code to ensure your extension's latest code is running
Key Components in an Extension
Activation Events
An activation event is an event that VS Code will listen for before the extension is activated (i.e., your activate function runs, your commands are registered, etc!) These are specified in a JSON array in your package.json. While you can activate your extension when VS Code starts up, in most cases, this is probably unnecessary. You certainly don't want to slow down the boot time for your users by prematurely activating your extension. In kazoo's case, the extension is only activated when one of its commands are requested:
A full list of activation events can be found here. I would recommend starting with a narrow activation event scope such as onCommand or onLanguage, depending on your extension's purpose, and evaluating whether the extension requires activation earlier.
Contribution Points
A contribution point is a general term for declarations in the package.json file that tell VS Code how your project is extending its functionality. At the bare minimum, you will likely be defining commands and configuration values if your extension requires user settings. Depending on your extension's complexity and required functionality, you may define menus, keybindings, themes, etc. A full list of contribution points and their purposes can be found here. For the kazoo extension, I only needed to define commands and configuration settings.
Commands
Commands require a command and title value at a minimum. The command must be in the format of your extension's name and a unique identifier for the specific command, i.e. myExtension.updateText. The title value is the human-readable/searchable value that shows up in the Command Palette. While not required, the category value can be provided to group related commands with a prefix:
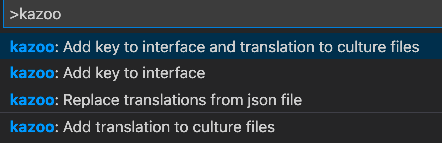
An example of commands grouped by ‘kazoo' in the Command Palette
The command value is also used for reference in Activation Events, for example: onCommand:myExtension.updateText. For more advanced configuration and use-cases, you can view the official documentation here.
Note: While commands need to be defined in the package.json file, they will also need to be registered/bound to functions from the extension code. A code snippet will be provided in the "Examples" section later in the article.
Configuration
Oftentimes, you will want to provide settings to change the behavior of your extension. From the package.json, you can define settings, their types, as well as any default or possible values. The title property in the configuration field should match your extension name and acts as the highest level "grouping" of settings.
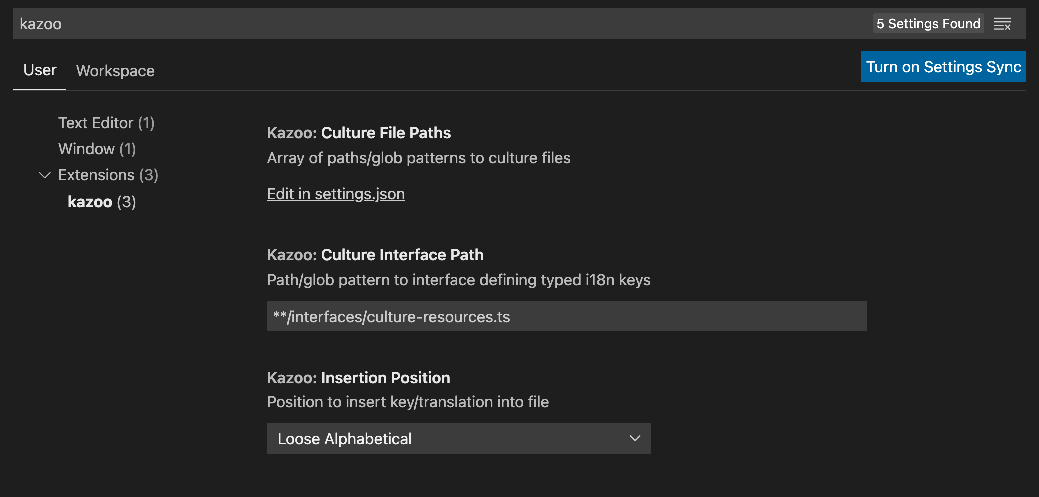
Example of the settings panel for kazoo
A setting should have a description and a type filled in to help guide users. Settings that are number, string or boolean types can be edited directly in the UI, while object and array types need to be edited in the JSON directly.
Optionally, you can provide a default value for a setting with the default property. For more advanced configuration and use-cases, you can view the official documentation here.
Note: while configuration settings need to be defined in the package.json file, your extension might require (or at least benefit) from some additional interfaces and utilities for reading values. A code snippet will be provided in the "Examples" section later in the article.
import * as vscode from "vscode";
It's time to tie it all together. The VS Code API provides pretty much all of the building blocks you need to start writing your extension, such as asking for user input, opening files, editing the current selection, etc. I won't go over every single namespace and function they provide — pulling the @types/vscode package into your project should provide helpful hints for the API as you're developing, in addition to the web based documentation found here. I will provide snippets of very common functions that I needed to build kazoo.
Note: most of the VS Code API is asynchronous — meaning you will need to leverage async and await or use the Promise API to properly handle responses. For something like a toast message, it may not be mission critical that your extension waits for the message to appear before continuing. As a best practice, I would recommend await-ing anything in the VS Code API that returns a Thenable (a custom type that essentially represents a Promise, agnostic of its implementation/library) to avoid potential bugs or nondeterministic behavior.
Examples
Packaging & Publishing
While your extension's project looks and feels a lot like a standard npm package, it requires some extra work for it to be published and distributed on the Visual Studio Marketplace and show up in the Extensions tab in VS Code.
For one, you'll want vsce installed, which is the Visual Studio Extension Manager. This is a command line tool that manages the packaging and publishing of your extension assets.
npm install --global vsce
Note: While you technically don't need to install vsce as a global package, it automatically adds the executable to your path so you can type vsce directly. If you save it as a development dependency, for example, you'd need to run it relative to your node_modules directory: ./node_modules/vsce/out/vsce
To test out how your extension would work once packaged and distributed, you can run vsce package. This should generate a .vsix file of your extension name in the current directory, which can be installed through the VS Code UI or sent to a friend for beta testing. Note that this should only be run after you've completed you've compiled/bundled your code — packaging up .ts files won't be of much use to a consumer.
For example, kazoo has an npm script for building the extension and a prepublish script that ensures the build runs before vsce package and vsce publish:
One thing to note is that the VS Code extension is packed up differently than what would normally be packed by npm — you'll pretty much get every file in your current directory unless you intentionally filter them out in the .vscodeignore file, which I highly recommend. You shouldn't need any .ts files, anything in node_modules, any markdown files, etc. An example file might look this:
Common files/folders that should be ignored from a VS Code extension's packing/publishing process
Be careful about what's packed up — a large number of files will hinder performance for your users, which is why the official documentation recommends using a JavaScript bundler to reduce file count. To see a list of files that will be packed up, you can run the vsce ls command. This is what kazoo is packed and published with:
assets/icon.png
dist/extension.js
LICENSE
package.json
README.md
Once you've packaged up your extension, you'll want to publish it so it is available to the public through the Visual Studio Marketplace and Extensions tab in VS Code.
First, you'll need to register an organization on Azure DevOps which will be used for authentication for vsce publish. An organization houses projects, boards, work items, etc. but we are only interested in the Project/Publisher aspect for now. While the organization does not need to have the same name as the Publisher, it might make sense to do so (for example, if you're publishing as an individual and not under your company/team's organization).
Once you've created your organization, you'll need to generate a Personal Access Token which will be used to create and authenticate as your publisher.
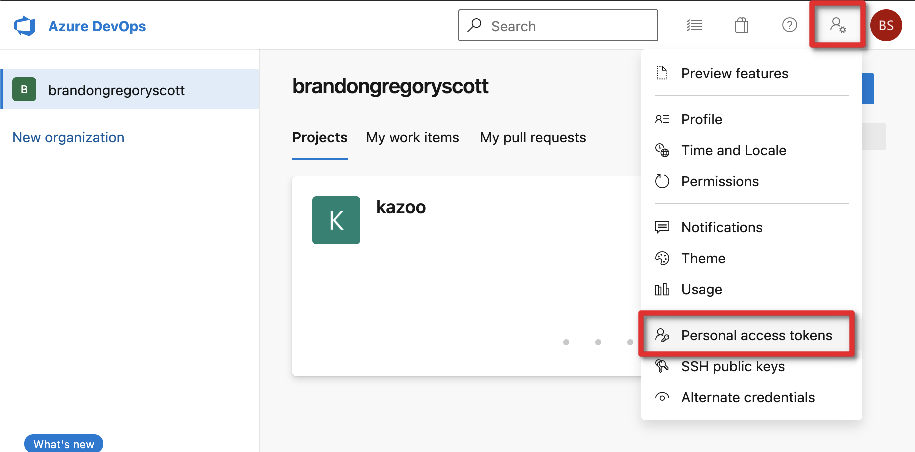
Access your organization's settings menu and navigate to the Personal access tokens page
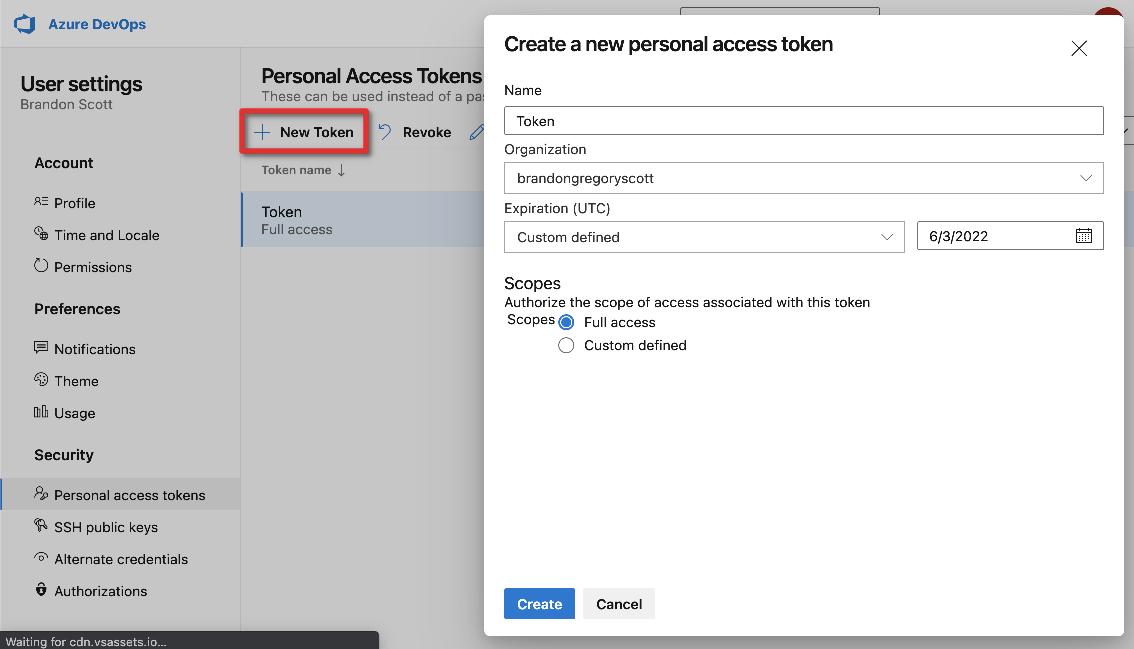
Create a new personal access token for publishing
You should only need to give access to the organization you plan to associate the publisher with (in my case, it is named brandongregoryscott), but the official documentation shows creation with the "All accessible organizations" option. I gave full scope access as well as a 1 year (maximum) expiration time. Copy and save this token for the next step — you'll need it to create and authenticate as your publisher account.
While there used to be a vsce command for creating a publisher, it has been removed and publishers now need to be created via the Visual Studio Marketplace.
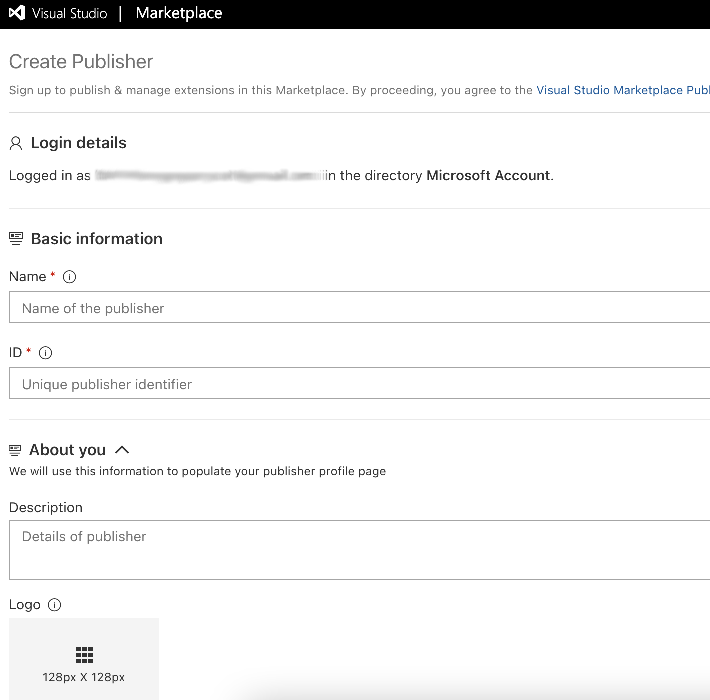
Create a new publisher for the Visual Studio Marketplace
Once you've created your publisher account, you can login via the vsce CLI and enter the personal access token created earlier.
vsce login <publisherId>
Personal Access Token for publisher 'publisherId':
Make sure your publisherId is defined in your package.json file (via the publisher property):
Your extension will be uniquely identified on the marketplace in the format of "publisher.name"
You're all set to publish your extension now!
npm run build && vsce package && vsce publish
Recommended structure and best practices
While you can choose to structure your project in many different ways, I'll explain the structure of kazoo and some of the reasoning behind it.
├── src
│   ├── commands                        # Command handler functions
│   │   └── add-key-to-interface.ts     # Single function exported for handling the ‘addKeyToInterface' command
│   ├── enums                           # Enumerations representing states/values
│   ├── extension.ts                    # Entrypoint that registers all commands, executes any necessarily setup on activation
│   ├── interfaces                      # Typed interfaces representing objects
│   │   └── extension-configuration.ts  # Strongly typed interface representing the object returned from vscode.workspace.getConfiguration().get<T>("extension");
│   ├── types                           # Custom types (such as aliases, unions, etc.)
│   └── utilities                       # Modules containing common utility functions to promote code-reuse and to be tested in isolation
│       └── config-utils.ts             # Functions for retrieving the user's config or a default version of the object
My biggest piece of advice is to pull out as much shared logic as possible into utility/shared functions which can be called from the context of each command handler function. Each command handler function should live in its own file with a single export, and be easily located by conventional naming (kazoo.addKeyToInterface contribution point → src/commands/add-key-to-interface.ts → exports single named function addKeyToInterface)
Conclusion
With the steps and examples provided in this article, you should have everything you need to get your first VS Code extension up and running. For more complex examples, take a look through the source code of kazoo. Feel free to leave a comment here if you have a specific question or find an issue with the information in this article!
Resources and more examples
- View the source code for the kazoo extension mentioned throughout
- TypeScript website
- Yo (Yeoman) on npm
- generator-code (VS Code extension generator) on npm